Friday, September 3, 2010

Too many Peaches?

Just a follow up to that last recipe--if you lovelove peaches like myself and wish you had access to them in the winter..you can!  it is so easy to freeze them and store them for things like wintertime-peach cobbler, or smoothies or for your cereal in the morning..hmm

Ingredients:
- Peaches (as many as you would like)
- 1 Lemon or so (you will need the juice so it depends on how many peaches
- a flat surface, preferably a cookie sheet (a plate would work just fine)
-a bag or container to keep them in after they are frozen


Directions:
1.  Slice the peaches into flat thin strips
2. Place them on a flat plate or cookie sheet
3. sprinkle the peach slices with some lemon juice
4. place into the freezer flat and allow to freeze completely through
5. once frozen you may put them into a bag or container and they will retain their lovely little shape.
6. take them out when you are feeling nostalgic for the summer!
7. Enjoy!

Peach Cobbler

  Delicious Peach Cobbler

   Ontario's peaches have finally started to come in - and this is a great way to make the most of them.


Ingredients:

Peaches (you can substitute any fruit of your choice), cut into 1-inch slices/chunks; 8 is usually sufficient
1 cup old-fashioned rolled oats
1 cup crushed walnuts
1 tablespoon organic cornstarch
1 teaspoon baking soda
1 teaspoon baking powder
1 cup organic cane sugar
1 cup organic brown sugar
1 tablespoon nutmeg
1 cup organic flour
1 stick butter (1/2 cup)
Pinch of salt
1/4 cup organic honey

Directions:

1. Preheat Oven to 350F.

2. Chop up peaches and put in saucepan along with 1/2 cup of cane sugar and cornstarch.

3. Stir until peaches have softened and the juice has begun to
thicken. (When you are cutting up the Peaches make sure not to let the precious juice escape!) When this is done set aside for later.

4. In a mixing bowl add the flour, baking powder, baking soda with a pinch of salt. Cut up the stick of butter and mix together with your hands. The majority of the dry mixture should be attached to the crumbled butter.

5. Put the peaches in a baking dish and then top with the butter/flour mixture. Then add the crumbled walnuts, oats, honey, brown sugar and nutmeg.

6. Allow to cook for 25-30 minutes or until the top is nice and crispy.

7. Allow to cool, add some fresh fruit, ice cream and enjoy!


Sunday, August 1, 2010

Bacon Backpack Chicken and gravy

In honor of my new kitchen inside my new apartment I decided to cook an extravagant meal for my lady friends.  I took a trip to the Healthy Butcher to see what I could get for the best deal.  After browsing the entire store I decided a whole chicken was how I was going to get the most bang for my buck.  I purchased a 3 lb organic Ontario chicken for 13 bucks then picked up some organic bacon and was good to go.  It had been a while since I had bought a whole chicken but the more I thought about it the more I realized how brilliant it is.  Not only did I have plenty for my lady-night dinner, but I had enough meat to last a week's worth of salads and another week worth of home-made chicken soup.  Needless to say I was really excited!

So onto the marriage of bacon and chicken...It was a recipe I had dreamed of really and something inspired by my bacon-loving partner.  and it is what I now call "Bacon Backpack Chicken"

Bacon Backpack Chicken

Ingredients:
- 1 Whole Chicken
- Some butcher string (or even dental floss as my mother suggested)
- 4-8 slices of bacon (depending on the size of the strips and of the chicken, you want enough to cover one side of the chicken)
- 2 tablespoons butter
-  salt and pepper to taste
- 1 teaspoon of dried thyme
- 2-4 carrots chopped
- 2 cups of beef broth
- paprika to taste
- 1 teaspoon dried sage

- 1-2 onions
- Extra veggies you may have in your fridge...some potatoes or tomatoes (these will go underneath the chicken!)

Directions:
1. Preheat the oven to 450 degrees. 
2. Rub the chicken with butter and a mixture of the spices on the inside and the outside.
3. Chop up the carrots and onion and put them inside the cavity of the chicken as stuffing.  Try not to over stuff, the inside should be full but not exploding.
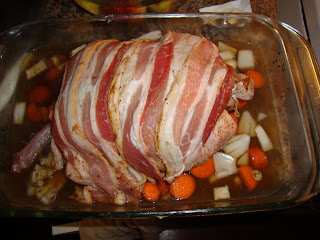
4. Put the extra veggies (carrots/onion/potatoes/tomatoes) in the baking dish along with the two cups of beef broth (for the broth I bought Beef Bouillon cubes, broght two cups of water to a boil and then added it into the baking dish)
5. Place the chicken on top of the veggies and the broth in the dish so that breasts are facing up.
6. Place the strips of bacon so that they cover the whole top of the chicken and are draped around its sides.  sprinkle with some extra paprika for added smokey flavor.
7. Bake at 450 F for 15 minutes and then reduce the heat to 350F and cook for 1 hour and 30 minutes.  If you have a baster then bast the chicken aver 30 minutes or so...if you don't then just spoon the juice around but try not to burn your hand!  Or you can skip it...the chicken will taste amazing no matter what. 
8. Once the internal temperature has reached 180 F when taken from the thickest part of the thigh...or you cut into the thickest part and it is cooked through then remove the bacon and set aside.  Place the chicken back in the oven at 450F for another 15 minutes or so in order to get the skin nice and crispy.
9.  Remove the chicken from the oven onto a serving platter to cool. 


Bacon Backpack Chicken Gravy:

Indgredients:
- the Juices and broth that cooked the chicken
- 1-2 tablespoons of cornstarch
1. Pour the leftover broth into a small sauce pan.
2. Add a tablespoon of cornstarch and bring to a boil.
3. reduce the heat and allow to simmer for several minutes until the liquid has thickened up a bit.
4. Turn the heat off and pour into a side dish for the chicken.


A couple of things to remember are:
- Do not eat the stuffing inside the chicken...instead set it aside and use again when making your chicken stock.
- Save the bones from the chicken for stock
- The gravy will be sooo good I promise, it is worth the extra step at the end!


This was definitely a crowd pleaser--we ate and ate until we could eat no longer...and then we enjoyed my seasonal Peach cobbler...

Friday, July 23, 2010

Turn boring old Oatmeal into Oatmeal Pancakes!

I have often felt that pancakes were a poor breakfast choice because they low in nutritional value.  This is only because my idea of pancakes was also Aunt Jemima's idea of pancakes which is a mysterious dry mixture (containing bleached flour and other various filler ingredients) mixed with either water or milk and/or eggs.  This unhealthy process was always followed by a light frying in hot hot oil and then topping with vast amounts of sugar or syrup or something desert-y.  I am not saying that a trip to pancake house now and again isn't a grand time, but when I am thinking of everyday FEEL GOOD breakfast I am not thinking of pancakes...That is until I stumbled upon OATMEAL PANCAKES!

Now I really like this recipe because it relies on a bit of honey to sweeten the batter without getting too desert-y!  Anyway...here is a FEEL GOOD pancake recipe that is easy and delicious without lots of filler.sugar.desert material.  :)

 Oatmeal Pancakes


Ingredients
- 1/2 cup unbleached all-purpose flour
- 1/2 cup whole wheat, grain or almond flour
- 1/2 cup oatmeal flakes

*TIP you can use any three kinds of flour/grain as long as you keep the measurements consistent!

- 1 tablespoons baking powder
- 1/2 teaspoon ground nutmeg or cinnamon
- 1/4 teaspoon salt
- 1 cups milk or water
- 1/8 cup vegetable oil or melted butter
- 2 tablespoons honey
- 2 eggs
1 teaspoon or more of pure
vanilla extract

Method

1. Preheat that pan, let it get nice and hot.  I always splash a couple drops of water to check if the pan is hot enough--if they sizzle you are good to go. Keep the heat on medium-high so that the batter will cook while allowing the pancake to turn golden brown
2.   Hand Mix the ingredients and be patient.  This mixture takes a bit of time to get to a nice even consistency but it is worth it.
3.  Spoon your batter into your pan.  I am a fan of making small stack-able pancakes.
4.  Wait for the top layer to bubble and for those bubbles to burst.  When this has occurred evening on the surface flip to the other side.  At this point the pancake is mostly cooked so it should only take another minute or two for it to be done.
5.  If you are making a big ol batch put your pile in the oven to keep them warm.

6.  Rinse and Repeat!


Saturday, May 15, 2010

Eat/Dance/Yell Your Way to Balance

Hello blog friends, it has certainly been a while since my last entry-- something I didn't anticipate when I first started this blog.  I began this blog for several reasons;  I was cooking all the time, discovering new things and wanted to share how accessible this experience could be, I was really involved in the Food movement in Toronto and I wanted to connect with others and share my experiences and because I had a lot of free time and wanted to put all my energy into things that made me happy and were productive.  Since this time (seems like long ago..) I now have very very little free time because I am still very involved in the Food community, am putting my energy where I want it to be and because I am working two jobs! Oy Vey!

Through these last few months I have struggled to keep my life in balance.  It is hard to eat well, exercise, socialize, volunteer and be a work-o-holic all at the same time.  Needless to say my cooking and blogging got left by the wayside, partially because my camera isn't charged and partially because as much as I have tried my life has not been fully balanced.

I thought that instead of sharing a recipe for food that I would share my thoughts on a recipe for balance, which to be clear, involves eating good food!

1. Eat Breakfast Every Day: My usual choice is 1/8 cup of Oatmeal and 1/8 cup of Red River added to a pot with 1 cup of water and a teaspoon of salt.  I usually throw this in the pot and allow it to boil as I brush my teeth, stretch and wash my face.  On mornings when I skip this routine I find I am prone to headaches, uneven moods and a deep angry hunger by lunch time.  For those with "crazy-life-syndrome" (which may be the majority of the people I know) this is an important ingredient to a balanced life.  (sometimes I made hot cereal in several batches and put in the fridge so all you have to do is reheat in the morning! saves 7 minutes of cooking and 5 minutes of cleaning!)

2. Close Your Eyes and Relax:  This is something that is easily neglected, but when I find 30 minutes to rub together I try and find a quiet place where I can just simply close my eyes.  At first it may seem a perfect time to check e-mail or return phone calls...this 20-30 minutes can make a huge difference! I usually set an alarm on my cell phone that vibrates when the time is up.  Giving myself time-outs allows me to clear my head and refresh for the rest of my day.

3.Always keep food with you (and water!):  If you look in my backpack you will usually find some sort of fruit, maybe a meal bar, some trail mix and then a secret hoard of pens (oops!).  One of the hardest things is making time to eat and this has a MAJOR influence on your moods and energy levels.  When you are not getting enough sleep and rushing around you should at least be eating and since eating takes time that you may not have I suggest taking a moment to throw in healthy whole foods into your bag/briefcase/purse/pocket for the day.  This prevents you from eating something Nasty that won't provide you with useful energy as well as provides an easy solution when you feel stressed about being hungry.  Also water..if you hate a big bulky water bottle--get a SMALL ONE, staying hydrated will prevent you from getting headaches and feeling dry and gross.  You should try and have at least 2 Clear Pees a day! (That's right..Clear Pees)

4.Work it Out:  When you are super busy you generally don't have time to deal with every inch of your personal life.  This may refer to your emotional state, your stress about non-work related things, your friends/family yadda yadda.  But even though you don't have time to deal with these things, they are still happening and you are still feeling but are generally unable to fully deal.  For this I try and work out, go for a short run if I have no time at all or go for a full on body busting session if I can make it happen.  But either way getting just a bit of a work out in a couple times a week relieves a lot of the pressure you feel emotionally whether you like it or not.  I think it gets neglected that exercising is important for your MIND and not just your body.

5. Be Lazy: If you have one day to sleep in..then do it.  Do not get up early because you think you will get more things accomplished.  A morning off to re cooperate will refresh you from your last week and set a positive tone for your next one.

6. Dance/Sing/Yell: In Your room, at a bar, in the shower, on the street.  Wherever you feel comfortable.  You have to Dance and Yell and Sing a bit.  I know we are all responsible adults these days but you have to let out a huge scream here and there, sing while you ride your bike, dance while you fold your laundry, dance at an awesome concert or something or other.  Apart from always keeping food with me...this is my favorite thing to do.  


I am sure there are a thousand and one other things one can add in their recipe for balance...but this is mine so  far.  It is still being revised daily as things are always changing.  If you have any ideas or additions from your own recipe for balance please feel free to comment below.
until next time! 

Sunday, April 18, 2010

Diet and Body

I know that I have talked in length about my love for beans but I must also share my love for the Bean cousin, The Lentil.  My life has been very hectic recently, I have been feeling stressed and my energy levels have been a roller coaster of inconsistency.  While I am in a very happy place and feel as though I am finally putting most of my energy where I want it to be (FOOD!)  I often remind myself that my diet is one of most important places to take control of how my body may be reacting to the stress I put it under.   
 
In that I am a big advocate for Self Medicating Diets.  At the very least I believe that people should look toward their diets when they are dealing with mild discomfort and/or specific illness.  I am not saying to avoid doctors or to not take symptoms seriously, I am only suggesting that our diets are a key place in determining how we feel.  For instance, when I am feeling low and in need of energy I look to complex Carbohydrates like Oatmeal in the morning and other whole grains. And when my stomach aches I am often soothed by a mug or three of mint tea.  The more I get to know food the more I am impressed and not surprised by how powerful my diet is to my general condition.  My constant ache of food knowledge has recently led me to finding and reading Super Food Pocketbook by Michael Van Straten.  For any curious readers out there--I found this book to be an interesting and informative reference on many common foods.  Van Straten explores 100 foods alphabetically examining their nutritional properties and highlighting health benefits and medicinal uses.  Van Straten Also goes through Vitamins and Minerals explaining how the body absorbs them, why they are important and what foods contain them.  As a Foodie with a strong curiosity for Nutrition I would definitely recommend this little handbook. 

I am interested in sparking your curiosity and would like to challenge you to being more mindful of what you are eating, what your conditions are (stress? no stress?) and how you feel.  See if you are able to find more peace by being more aware of these things.

And in that vain I will share with you one of my favorite recipes.  Sran Style Dhal ripped right from the pages of my roommate Venice's Mother's handwritten cookbook. 

Sran Style Dhal
Serves 4 
Ingredients:
- 1 cup red lentils (if you can find yellow lentils mix half and half)
- 1 onion
- 4 cloves of garlic
- 1 tbspn cumin seeds
- 1 tsp turmeric
- 1tsp salt
- 1-2 inches of ginger (I find that less is more)
- 1 tomato
- 1/2 tsp Graham Marsala
- 1 tsp coriander 
- 4 cups of water

Directions:
1. In a frying pan: heat up a couple tbspn of oil, once heated well turn the heat down to low and fry the cumin seeds for about a minute.  Then add the onions and allow to cook for a minute or two.  Then add the garlic and allow to cook for another minute or two.  Finally add the ginger and allow all things to be cooked through until the onion is nice and limp. Turn off heat!
2. In a sauce pan add the lentils and the water (Ratio is 1:4::lentils:water) bring to boil and add turmeric, coriander, and salt ( Hold off on adding the Graham Marsala until the end).
3. bring down to simmer and add the Tharka Mixture (which is the onions/garlic/cumin seeds/ ginger)
4. Let simmer for a couple of minutes, you want to avoid soggy lentils! however if they do get soggy they still taste good and you will get better next time
5. At last add the cut up tomato and the Graham Marsala and allow to heat through.
6. Turn off heat and enjoy!


I find Lentils to be a great food when I am feeling stressed.  Dhal especially is energizing, filling and comforting.  

Beans Beans the Musical Fruit

I love beans!

I love beans because they taste good, have an excellent texture and are versatile.  I have learned to love beans also because they are rich in Protein, Fiber, Essential minerals, B vitamins and Folic acid.  And I love beans because they are low in fat and good for cholesterol ( which happens to be a big issue in my family!). 

Due to my exxesive love of beans I often begin with beans when planning my meals.  This week I bought a bag of dried organic black beans and thought Hmmmmmmmmm wherever will these little tiny flavor pockets take me this week? True to form (and inspired by my very good friend Lilian Galante) They took me to Mexico. 

Last Year I ventured down to Mexico to celebrate in the wedding of my friend Lilian and her lovely partner Pape.  While I was down there I joined 50 of my new Mexican best friends and enjoyed three breathtaking days on the Pacific Ocean.  As usual, I was very excited about the food we were eating.  For the first time in my life I didn't feel a hint of guilt snacking on the Avocados that only ventured a small distance to the beach property we were camping on.  Lilian and Pape hired some lovely local women from the nearest village (a 20 minute walk away) so come and cook the meals for us.  These meals were very much centered on BEANS (i was thrilled!).  So long story short here is a meal that was inspired by this journey and by beans...i suppose you can call it a partnership between Mexico and Beans.  Yes..


My main Dish was Moosh's Mexican Beans and Rice...Vegan style

Black Beans
1. Soak 3 cups of black beans for 2-4 hours
2. Drain and rinse beans taking out anything out of the ordinary (rocks? weird looking bean?)
3. Put in a pot with 6-8 cups of water and bring to a boil.  Once you have reached boil bring the heat down to simmer.
4. Allow to simmer for 1 hr or until tender...you don't want the beans to get too mushy so keep an eye around the 60 minute mark and take a few test bites!


Rice
1. Sautee Onion and garlic for several minutes.
2. Add Rice and coat with the mixture, when heated through add the needed amount of water for your rice variety
3. Follow the directions on your rice package as far as proportions of water to rice and to timing ( I used Brown rice which took about 45 minutes and was 1:2::rice:water
4. While bringing rice to a boil add 1-tbsp of chili powder (depending on how spicy it is and how spicy you like it), 2 tsp of salt, 1 tblsp of Paprika, 1 tbspn of cumin, 1-2 tblspn of cayenne pepper.  Allow the rice to cook regularly with these spices added.
5. Once the rice is cooked add those beans! along with another batch of spices (this varies depending on how spicy you like your food...for me I didn't add too much more cayenne pepper, but I did add several teaspoons each of coriander, paprika, salt and chili powder).
6. Add chopped coriander along with half a can of whole tomatoes. 
7. Turn up the heat and bring to a small boil so that all of these tasty things can mix together.
8. Turn heat off and mix well.
9. WAALLAAH!

When cooking for myself this dish would be plenty for a meal but I was lucky enough to have three hungry guests over so we added several other things to our menu.

Salsa

Ingredients:
- 3 tomatoes
- 1 red pepper
- 1 green chili (for mild spice...add more for spicier foods!)
- 1 onion
- 1/2 lime
- 4-8 tbspn of fresh cilantro
- 4 garlic cloves minced
- salt and pepper to taste

Directions:
1. Chop everything and Put it in a bowl!
2. Mix it together
3. Eat it!

The thing about Salsa...is that it shouldn't be an intimidating thing to make.  You really only need several basic ingredients, some way to flavor it (either with fresh cilantro and chilis or with dried spices..whatever you have available)  Tracy is pictured on the Right Showing us the most important step...how to Eat the Salsa!

Our last component of our Mexican Inspired Fiesta was some crumbled up tofu sauteed with mushrooms onions and garlic (oh my!)

BBQ Tofu Crumble 
 
Ingredients:
- 3 cups of mushrooms
- 1 Block of Tofu (nice and locally produces from Essence of Life Organics!)
- 3 cloves of garlic
- 1 onion
- 2 tsp Paprika
- 1 tblspn Cumin seeds
- salt and pepper to taste
- 2 tsp cayenne
Directions:
1. Saute Onions and garlic for 2 minutes.
2. Add Chopped mushrooms and cook for another 2 minutes.
3. Crumble in tofu so that it is a "ground beef like consistency"
4. Season and allow all things to cook through.  The tofu will be done when it has shrunk has dried out a bit.


We made little fajitas with Corn Tortillas like the ones I encountered while eating in Mexico.  Added some chopped avocado, cheese and lemon to turn into one heck of a filling meal. 

Yum!

Wednesday, April 7, 2010

Urban Agriculture: Breaking Ground!

As you can see above I have been engaging in a little Urban farming here and there.  As a follow up to my last post I wanted to share some pictures showing how a boring old back yard can be transformed into part of an urban patchwork farm.


Monday, March 29, 2010

New Initiatives in the Air: Young Urban Farmers-Community Shared Agriculture

 March 28 marked the groundbreaking event for the Young Urban Farmer's CSA project. Before I go any further I will define my terms and explain what exactly is a "CSA" and what exactly is a "Young Urban Farmer"


Ahem..I hope I have this right..


Young Urban Farmers is a small business started by Torontonion and fellow young person Christopher Wong.  YUF promotes food sustainability by returning ownership over your food in the simplest way imaginable; by planting the food in your own backyard!  Chris has set up a system compatible with all of that unused space in most people's backyard and offers a chance to engage with their space by setting up and maintaining family sized organic vegetable gardens.

Somewhere along the way Chris met Elaine Howarth and they discussed the idea of starting an Urban CSA.   first of its kind in Toronto.  !!


CSA stands for Community Shared Agriculture.  Traditionally CSAs have been set up so that eaters (usually a family) buys a share for a certain amount of money from a rural farm and in return receives a box of fresh produce every week spanning the entire growing season (approximately form June-October).  This has been a popular way for farmers to guarantee a certain amount of revenue for their growing season and build relationships directly with their consumers by bypassing food distributors.

The Idea of an Urban CSA borrows the concept of Pre-bought shares of their "farm" in return for a box of fresh produce every week.  However instead of the food being grown on a rural farm, the food is being grown right in the city!  In this case the food is being grown the backyards of homeowners who have graciously donated this space.  So the outcome is that Elaine and Chris and their army of volunteers   (that's us!) will set up meticulously calculated organic vegetable gardens in about 8 donated backyards across Toronto.  It is the hope that enough people will buy a share ( I believe its about $300 for the entire growing season) that this initiative will be a wild success!

There are several reasons that Toronto is ready for this initiative:
1. Local and Organic Food are in high demand and are often inaccessible.  Promoting Urban Agriculture directly links the need for good food with the possibility to get it in our back yards (and if we don't have out own backyard we can connect with organizations like YIMBY (Yes In My BackYArd) or the Toronto Community Garden Network)
2. Some of the most fertile land in Canada is right underneath my very house-- and yours!
3. As was very evident at the Youth Food Systems Fair I spoke about in the previous entry--there is a growing group of young people who are enthusiastic and ready to change the way our Food systems currently are. 
4.  The first step is the hardest! With the YUF-CSA getting off the ground, this idea will spread like wild fire--inspiring more and more people to see how possible it is to grow their own food !

so now that I have hopefully illustrated a clearer picture of this New Initiative I will hopefully be back with some pictures and details on more of the beginnings of this awesome project.

Yesterday I joined 6 other enthusiastic gardeners and spent 5 or so hours turning one family's boring backyard into a ready to plant urban farm.  We pulled up all the sod, built a composter, SERIOUSLY aerated the land and double-dug our way to producing 4/14 planting beds.

With an aching back and some serious battle bruises I look forward to ho-ing away at the rest of the lawns that make up YUF's Urban Farm!

New Initiatives in the air: Youth Food Systems Fair

This past week has been really exciting for the Foodie community in Toronto.  As the ground begins to thaw the initiatives that busy passionate-young people have been working on all winter are thawing as well.  I would like to share several things that inspired me this week with the hope that they can inspired you.

On March 25th The Toronto Youth Food Policy Council partnered with Lauren Baker' s University of Toronto Food Security Class to put on the "Youth Food Systems Fair".  Thanks to the brilliant work of my favorite Wisconsinite Tracy Phillippi and the other committed members of the the TYFPC close to 300 young people came together to listen, learn and mingle.  Bordering the room were the artistic final projects of 30 or so U of T students who had gone out into the Foodie community and worked closely with various Local organization.  In the Middle of the room were maybe 20 local community groups committed to Social Justice Issues surrounding food in a career fair format.  Except instead of the traditional format of larger corporations sending out pawns to talk up their company and recruit file clerks and  mail-room-Representatives--those tabeling the event were founders and organizers, movers and shakers.  They were all full of energy and open to telling you about their mission and reaching out to all of those interested.  The powerful positive energy potentially connected 300 new young people to these organizations--some new and some older, but all with so much room to grow.  The event was Catered by my Group The Hot Yam! making sure to reinforce ideas of growth and connectivity with nutritious vegan curried lentil and squash wraps followed by chocolate cake (yum!).  For me the fair felt great because I got to see the hard work of my friends and colleges as organizers of the event pay off.  It is amazing what you can accomplish with motivation, inspiration and excellent time management.  It is easy to become discouraged and frustrated when you are working towards "the greater good"and it is easy to lose sight of the network of people and groups that are there in partnership and support.  It is events like these--that devote 4 hours on a Thursday night-- that connect the ever expanding community and prove to all those involved that their work is valued and supported while inspiring new people to challenge themselves and start even more amazing projects.

College Street Cooks take on F.O.S.

The College Street Cooks struck again earlier this month in a cheesy montage of garlic infused foods  stuffed in deep sour dough bread bowls.  The hosts of this little cooking party were Hannah Lewis, Tracy Phillippi and Spud the kitty cat- who hosted myself and Kate Jefferey in their lovely home.  Tracy Represented her Wisconsin Onion Farming roots by whipping up a surprisingly simple and delicious version of the age-old classic French Onion Soup served in a Sourdough Bread bowl. While Hannah contributed one of her favorite mixed veggie recipes!  All I have are some pictures below provided by Tracy and the Promise of the Recipes to come. 


 Kale.Peas.Sweet Potato Medley and F.O.S.


-see you next month!

Tuesday, March 23, 2010

Never let a good Parsnip go to waste: Pretty Parsnip Carrot Soup

Part of shopping on a budget--especially when trying to buy foods that are local and organic (eeek! so expensive) Is looking around the shop and seeing the state of things.  By this I mean that when I go to my local organic produce shop (That is Kensington's Essence of Life Organics) I follow a specific routine.  First I examine the parameter--I look and see what they have, where it is from and what the cheapest options are. My favorite place to start is usually a small bin over on the right where there is a usaully a small pile of "over ripe" produce that is often Very local, Very organic and compared to most other things VERY cheap.  Sometimes you find ancient ginger, half rotted exotic fruits and the such--This is where I usually find either my immediate snack of the day or my week's soup.  After this little adventure I then consider where I should be frugal and where I should splurge.  I usually am very happy to choose the cheapest options of potatoes, onions and some kind of leafy green and then continue to negotiate and over analyze all other prospective produce.

Last week I struck pure gold when I found three nicely sized organic Ontario parsnips mixed with a few bright orange carrots.  I looked past their pruned skin and bruised bodies and saw my dinner for that evening (and lunch the next day...and the next...and the next).

I put together one of my wintertime favorites:

Pretty Parsnip/Carrot Soup
Ingredients:
- 4 cups of washed and chopped Carrots
- 2 cups of washed and chopped Parsnips 
- 1 yellow cooking onion 
- 4 cloves of garlic minced
- 1/2 tsp chili flakes 
- 2 tsp sage
- 1 tsp thyme
- pinch of salt
- 2 pinches of black pepper
- 1 tsp paprika 
- 6-8 cups of Veggie Stock (in this case I used some frozen Veggie Stock made here)
- 2-4 tbsp butter

Suuuuuuuuper Soup:
1. Chop Carrots and Parsnips into little bite sized cubes--as shown from a birds eye view in the photo--they cook much faster this way!
2. On a Medium Heat in a Pot that can hold at least 8 cups of water,--Saute the onion and garlic in half of the butter.  Once the onions are soft add the carrots and parsnips and the rest of the butter.  Mix well so that the veggies are nicely coated with the butter/onion/garlic mixture and allow to SWEAT it out for several minutes.  Make sure to keep and eye and mix well so that the bottom does not burn.
3. add the spices--use more or less of your favorite ones--I find sage and the chili flakes to be the most important ones! (well..and the salt)  Allow the spices to mix well with the veggies.
4. Add the stock and turn heat to high to reach a boil
5. Allow the soup to boil for a minute or two and then reduce to simmer for at least 45 minutes.  At this time taste and add more salt or pepper if neccesary
6. If you have an Immersion blender then this is a good time to blend the soup...if not you may want to wait until it is cool so that you don't burn yourself...however I am often impatient and gamble with the whole burning situation...


And Wallah! a nice thick tasty soup! 

Moosh's Sweet and Crunchy Couscous and Kale Catastrophe

Even though it has been a little while since I've last posted, that doesn't mean that I have not been cooking away!  Lately I have been experimenting with Couscous which is a lovely grain that is high in fiber and mighty filling.  After several test runs with varying kinds of veggies and dried fruit I have decided on a very basic recipe that has tons of texture, nutrients and flavor.

Introducing... 

Sweet and Crunchy Couscous and Kale Catastrophe
This Recipe calls for:


- 1-2 cups of chopped kale
- 1-2 cups of chopped crimini mushrooms
- 1/2 yellow cooking onion
- 1/4 cup of sliced almonds
- 2 cloves of garlic minced
- 1/3 cup of whole wheat organic couscous
- a handful or two of raisins or craisins
- 1-3 tbs Olive Oil
- a splash Red wine or Balsamic vinaigrette
- 1 Cup of water


Directions:
1. In a Frying Pan with Burner on Medium, heat up a splash of olive oil. when heated slightly toast the almonds for 1-2 minutes.
2.  Add garlic, onions and allow to cook until tender for 1-3 minutes. Add mushrooms and a splash or either red wine or Balsamic vinaigrette.  Allow for all the liquid to dissolve--this should happen rather quickly. Next add the finely chopped Kale and allow to cook for another couple minutes. Turn on the heat and remove from element.
3. In a Medium-Large Pot add the couscous, water, raisins, and the stir fry and allow the water to reach a boil.  As soon as it reaches a boil turn the heat off and cover.  Allow couscous to sit for 5 minutes.  Remove the Lid and fluff with a fork.


I found this dish to be good both warm and at room temperature.  It is an easy dish to put in Tupperware and take for lunch since it is super filling!

Tuesday, March 2, 2010

Moosh's Crispy Veggies

Inspired by the fake fish sticks I decided to experiment with other ways to batter and bake my foods.  Looking around my kitchen the ingredients I used were:
- 3 cups of washed and trimmed string beans
- 1/2 eggplant cut into thinly sliced half moon shapes (left over from the Perfect Pizza)

Marinade: 
- 2 tbl Tamari
- 1tbl Rice vinegar
-2 garlic cloves minced
- 1 tsp sesame oil

batter:
-1/2 cup whole wheat flour
- 1/4-1/3 cup of water (You want your batter to be somewhat thick--but not too thick,..so slowly add the water to reach an  easily coat-able consistency--if you add too much water just add extra flour to compensate)

Breading:
- 1/4 cup of whole wheat bread crumbs
- 1/4 cup of rolled oats
- 2 tsp paprika
- 1tsp cayenne pepper (add more if you like things SPICY...i do not)
- 1 tsp salt
- 1 tsp pepper

Directions:
1. Mix the ingredients for the Marinate and then add to a bowl with the washed and cut veggies.

2. Preheat the oven to 350
3. After the veggies have marinating for as little as 30 minutes and as much as all day (if it is longer than an hour please refrigerate!!)  Set up your little station which will be placing a bowl with the batter next to the bowl with the breading next to the GREASED cookie sheet.


4. Coat each Veggie with the batter and then coat with the breading and then place the double coated veggie on the cookie sheet.

5. Repeat until you have done them all.  If you run out of either the batter or the breading--just add more ingredients.  
6. Make sure that the veggies each have their own room on the cookie sheet so they are not touching.


7. Place in oven and cook for approximately 30 minutes--until they are crispy...check on them and so see if they need any more time.
8. Allow to cool and enjoy!


I enjoyed my crispy veggies with some sauteed veggies and pasta.  They would also be really good as an appetizer or a party food with a dip.

Seedy Saturday (on a Sunday!) and Moosh Rolls

A large component of Food security is access to seeds.  Seeds are the start point of all food and the practice of seed saving is as older then agriculture I'm sure.   It may sound like a silly thing to be insecure--can't you just save seeds from last years plants?  The answer in many scenarios is a big sobering "NO". 

For probably the majority of Farmers in the world--especially in The United States (As my knowledge on the subject is limited) Seeds are something that have become engineered, patented and owned by major corporations.  That means that the seeds, the type of plant that grows from the seeds and the right to use/sell/save the seed is the now owned by companies and protected under heavy patents that allow these companies to sue/hassle/bully and make huge profits off of those that come into contact with their seeds.  So there are rules against farmers who use these "owned" seeds from saving them for next year or altering them, so that they are forced to purchase a whole new batch every year.  In fact! many of these seeds are genetically modified to provide only one year of growth and do not produce any reusable seeds form the harvest.    and thanks to things like wind, run off, rainfall and plain old mingling nature of NATURE--these patented seeds get mixed up everywhere--in all crops, and result in these large companies having legal rights to the places that they sprout up (which is everywhere!).

Sadly the ownership of seeds has resulted in large corporations having ownership over our food...in an alarming way!  It makes me wonder how they are changing the very DNA of our food and how these changes are affecting our minds, bodies and souls (not to mention our freedom).  

With all of this in mind, I was thrilled to attend an event called "Seedy Saturday" which was held on February 21 this year (falling on a Sunday).  This event is one of many ways growers can take back ownership over their seeds and their food on personal levels.  Being one of hundreds people to attend (maybe more...it was packed all day!) I was able to mingle with Toronto's inspiring organizations that are all gearing up for a fruitful spring.  There are so many exciting things going on this spring/summer.  Groups like the Young Urban Farmers who set up home vegetable gardens so that urbanites can produce their own food and connect with the process.   Or the Toronto Community Garden Network that offers support to those existing community gardens and potential for countless new ones.  


The event was full of useful FREE information, enough to inspire anyone to get digging.  I walked away with a whole bunch of seeds--herbs and sprouts and tomatoes... that I plan to get going as soon as we get through our last frost.  As well i walked away feeling excited for my own Community Garden that is currently being negotiated.  There will certainly more to report on my initiative to start a garden in my neighborhood as the process of finding land and people continues! 


After the event I didn't have too much time to prepare food for work so I made some salad rolls out of some Salad I already had Prepared.  i suppose these are Moosh Rolls...as I didn't follow any recipe and only tried to follow directions. 


Ingredients:
- Chopped and washed lettuce/lettuce mix
- 1 Yam
- 3 tsp brown sugar
- 1/4 red onion
- chopped walnuts
- 1 tomato chopped up nice and small
- Rice paper (sold at most grocery stores..I got mine at a Korean Market on the corner of  Bloor and Manning for $1.50)

Directions:
1. Preheat oven 400
2. Chop up yam into tiny cubed pieces 
3. Put on cookie sheet and sprinkle with brown sugar, chopped walk nuts and 1/4 cup of water
4. Roast together for 20-30 minutes--Check to make sure the yams do not get mushy!
5. take out and allow to cool
6. Wash and chop salad mix or head of lettuce
7. Chop and add tomato and onion and any other ingredient that you like in your salad
8. Follow the directions that come with your rice paper (you wet them for a certain amount of time until they are malleable) 
9. Add about a tablespoon of your salad in the middle of the rice paper. Fold in the short ends and then roll length wise.
10. Set aside to dry and them repeat.

Putting your salad into little rolls allows you to make your food portable--no fork and container required! 


Tuesday, February 23, 2010

The Perfect Pizza

Even though I live in Little Italy, the mecca of delicious pizza, I still insist on making my own here and there.  I usually buy my pizza dough at My Market Bakery in Kensington for something like $2 (it is also easily found at most grocery stores and other local bakeries...if not then ask them to provide it!)  and use whatever veggies I have in my Possession.  Last week I added all of the best things I could find which were...


 Ingredients:
1/4 eggplant sliced very thinly and halved
2 cups of mushrooms sliced thinly
2 gloves of garlic
4 tbsp of pesto
1/2 block of Mozzarella
1 Pre-made batch of whole wheat pizza dough 
Optional: 3 tbs of olive oil


Directions:
1. Preheat the oven to 400 degrees
2. Get the dough into your desired shape on your desired baking apparatus.  I use a cookie sheet, lightly sprinkle if with whole wheat flour and push and pound it out slowly.  you don't want to rip and reattach your dough...you want to keep it as one piece the whole time, so pumping it out may take a little while. 
3. If you want a thicker crust pizza then cover your kneeded out dough and allow to rest with a towl over it for up to 45 minutes...if you like it thinner then put toppings on and cook as fast as your hands can go
4. Put layer of pesto all over the pizza leaving as much crust that makes you happy.
5. sprinkle with your desired Cheese
6. Add the veggies.  When i use eggplant I put the chopped garlic right on top of the slices and then dribble with olive oil...this is for garlic lovers
7. Place in oven and cook for 20-30 minutes (Mine took about 25 minutes)
8. For the last couple of minutes turn the heat up or turn to broil so that your cheese will bubble...but keep an eye on it here so you don't have a burnt pizza pie

Moosh's Non-Fat Veggie Stock

My name is Michelle and I am a Soup-A-Holic.  It started about a year and a half ago when I discovered that making soup was easy, cheap, healthy and filling. I love that I can make soups from different ethnic backgrounds, that most soups share common ingredients, that i can put veggies that are good for me that I may not have eaten otherwise in a soup and get all of its nutrients....I could go on...The point is that I LOVE SOUP.  But until recently I had never made my own veggie stock!  I have been using Low Sodium Organic Veggie Bouillon cubes and calling it a day.  Things like stock intimidate me...you know?

Well, it turns out that Making your own veggie stock is no scarier then chopping up veggies and putting them in a pot! who knew? (apparently lots of people..but this is for those people who don't know and are about to learn)  Ahem

I have been recently shopping at St Lawrence Farmer's Market  on Saturdays.  (for non Torontonians this is a Year long artisan and farmers market that is a hub for local produce, meats cheeses and foods--also a hub for lots of NON local foods...but it is up to the shopper to become wise as to which is which) anyway...because of my schedule I have not been able to make it there very early meaning that I miss out on the majority of the eggs and cheese and most of the produce because the farmers leave when the sell out.  However since I get there late, the farmers who are left are happy to get rid of whatever they have left.  So several of these veggies I got for very cheap from a nice farmer who only had a little bit of stuff left.  Thanks!

 To make 16 cups of veggie stock (my intention is to freeze most of it...if you don't want to do this then cut the recipe in half!) I based this recipe on a mixture of ones I have read about...


Ingredients:
1 Onion
3 regular sized carrots
3 cups of mushrooms
3 cellery stalks
3 cloves of garlic
1 tomato
1/2 tsp of peppercorn
1 tsp salt
1/2 cup of parsley

Directions:
1. preheat your oven to 400 degrees Fahrenheit 
2. Chop up all of the veggies, don't worry about being too meticulous they will be strained out eventually!  save the peppercorn, salt and parsley for later...
3. For a completely non-fat stock pour 1/2 cup of water over the chopped veggies before putting them in the oven. If you don't mind a little fatty stock then go ahead and put a couple tablespoons of olive oil over the veggies.
4. Roast all together for 30-40 minutes
 

5. Split the veggies into two large pots and add 8 cups of water to each along with 1/4 tsp of peppercorn in each and 1/4cup or parsley in each. Allow to reach a boil and then let simmer for an hour.  
6. Strain your veggies out of and put aside for now.

7a. If you are making soup right away then take the allotted amount and continue on with your desired soup recipe and allow the rest to cool so that you may put it away in freezable containers

Moosh Method:
For step 7 I had a moral dilemma...what should I do with all of these fresh and organic (expensive and tasty) veggies? I didnt want to throw them out or compost them, I wanted to eat them! So I continued on to make a Valuable Veggie Soup. 

7b. Take the veggies and pick out the peppercorn (at this point it has done its job and if left it your soup will be VERY PEPPERY!!!) 

8. Decide how much soup you want to make and take that amount and put it in a pot (I went with half of my batch so 8 cups). Add the veggies along with sage, oregano, parsley (if you have any left--chances are if you have fresh parsley then you are trying to use it all up!) some thyme and whatever other spices you so desire, a pinch of salt to taste.
9. Bring to boil again and then simmer for another 45-60 minutes tasting and adding whatever it is you like.  If you have an immersion blender then you can go ahead and blend part of the soup.  I like my soup to be blended between chunks and smooth broth..so this is a personal preference.

At this point its up to you what you like--if you want to add some noodles or some spice?  I don't like those things particularly in my soup so I stopped here!

The end result is that I now have two 4cup containers of fresh frozen broth and 1 large batch of SUPER VEGGIE soup.   Really perfect for this grey-snowy-shitty-weather.


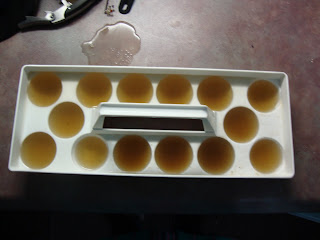
Also I put some of the stock in an Ice tray so that I can throw it in when I am boiling some grain or making a stir fry..yummy

Tuesday, February 16, 2010

Fake Fish Sticks

Something that kind of sucks about eating relatively healthy is that sometimes you just miss that processed foods flavor (or texture? or comfort?).  Because for most of us growing up in the 80s and 90s fast food and convenience foods were major treats.  Going to MacDonald's after soccer games, eating frozen dinners with the baby sitter and my personal favorite Kraft Mac 'n Cheese in the Blue Box.

When I was young my parents split up and their food choices were as different as night and day.  Whenever he had us, my father took my sister and me to MacDonald's for the now non-existent breakfast buffet.  Ashley and I munched down on food we knew was "bad" and enjoyed it mostly for that reason.  It was such a change from my mothers more health savvy (and delicious!) breakfasts of Oatmeal and pancakes which she would labor to make every morning before school.  I ate so well under my Mother's regime that the once-in-a-while cheat-eat didn't have too bad of an effect on my overall health.

Now that I am in charge of my own breakfast I usually opt for the more labor intensive Mother-Inspired breakfast.  I make either oatmeal (with Salt!), or yogurt and granola, or an omelet of some kind.  But once in a while I feel the need to indulge the naughty side of my stomach (Father-inspired) and that is when I go ahead and make hash browns, bacon, buttery toast ect.

I realize I have been rambling...so get to the point!

I found a recipe that is pretty healthy--but reminded me SO MUCH of childhood "bad" foods that I cracked out the ketchup and dug on in.

It is what I dubbed Fake Fish Sticks...because to me that is what they reminded me of....  In fact I got the original recipe from the TYFPC cookbook added by none-other but a college street cook Hannah Lewis. 

What you will need is
- 1 Firm block of tofu
- 3 tbsp of soy sauce
- 1 tbsp rice vinegar
- 2-4 garlic cloves (recipe calls for 2...but i like it extra garlicky so I added extra--it is up to you)
- 1 cup bread crumbs
- 2 tbsp of fresh coriander (the recipe called for parsley...but I had coriander so ahead with it I went)
- 1 tsp paprika (did you know that Paprika is Hungary's biggest export?)
- 1/2 tsp salt
- 1/2 tsp black pepper
- 1/2 tsp cayenne pepper (the more the merrier!)
- 3 tbsp whole wheat flour
- 6 tbsp cold water

 
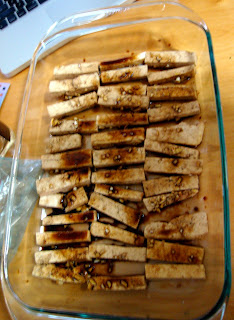
1. Cut the tofu into finger sized pieces.
2. Prepare marinate sauce by mixing together the soy sauce, garlic and rice vinegar.  Coat the tofu very well and allow to soak for up to 30 minutes. Now Preheat the oven to 400 F
3. Prepare the batter by mixing together the whole wheat flour and the cold water
4. In a separate bowl mix together the bread crumbs, spices and coriander (or parsley)
5. Now take those recently flavored tofu fingers and dip them into the flour/batter and then dip them into the spiced bread crumbs. Make sure that they are coated well--the thicker the better!
6.   Place on a cooking sheet that has been lightly oiled to prevent sticking. Make sure that each tofu finger has its own personal space and they are not impeding on the tofu finger next to them.  
7. Bake for 30 minutes...until they are nice and crispy.
8. allow to cool and enjoy! 

I enjoyed these sticks several ways.  I added them to a sandwich, I topped a salad with them and I dipped them in ketchup and ate them as finger food.  The lasted in my fridge several days and to reheat i just threw them into the toaster oven for a couple minutes until they were heated through and regained some of their crunchiness.

I really enjoyed this recipe!  It brought back a lot of memories of being a kid.  Before this I hadn't been able to really enjoy eating ketchup since I learned how much sugar was in it (I think in an Environmental class at U of T the day we saw a movie on the evil of Sugar).  But a trip to the organic store allowed me to get some semi-guilt free ketchup in the meantime until I learn to make my own (anyone have a good recipe out there??).


Also if you like THIS recipe you should pick up your own copy of the "So You(th) Think You Can Cook" Recipe book recently published by the Toronto Youth Food Policy Council by attending a meeting or event. Only five bucks!

Sandwich and Salad Combo

Recently I have been trying very hard to make my own food, my own sauces, my own soups and most importantly my own lunch.  This means that I often carry around 2-4 Tupperware containers at once and an extra shopping bag which I am sure the other riders of the TTC (public Transit) are just sooo curious about.  Anyway I wanted to share some simple recipes of the good old fashioned Sandwich and Salad Combo.

For both the salad and the sandwich you can use the same ingredients! Imagine that!


for the Sandwich I used:
- Pesto spread that I keep in my fridge and/or make when basil is fresh and accessible
- Shredded carrot
- Slice of CHeese
- Vegan/Veggie Burger--i went with the herb and garlic kind...you can put anything here though (Marinated tofu, Tempeh...a Tomato...)
- 1/4 avocado mushed at the bottom
- 1 Portuguese bun


 Then you just assemble and cut in half! 

As for the salad


- Shredded Carrot
- Craisins or Raisins
- Spinach
- some kind of nut--i used pecans
- an apple

As you know You can empty out whatever you have in your fridge for your salad...But if you are going for the sandwich/salad Combo its often easy to just used the same ingredients in both so when you are grocery shopping you don't have to get too carried away.

 This combo in particular I found to be very filling because with the sandwich cut in half, you can stagger your eating (if you have time!) and all the nuts in the salad make for a more hearty portion.

Enjoy lunch at the work place...people will be jealous.

Wednesday, February 10, 2010

An Experiment in Baking

I am not much of a baker...I enjoy a treat here and there (and when it is here..I usually enjoy chocolate) but I often rely on others to do all the churning and measuring for me as to avoid any baking catastrophe.  Sometime last year I began to bake for myself...I made a batch of cupcakes, followed by some shortbread cookies and then tried a cookie recipe.  The fated cookie recipe called for butter and since I didn't have any...I used MARGARINE...Now I am sure if you are any kind of baker you may know what I am about to tell you.  But my cookies tasted very weird, they tasted salty and no one wanted to eat them.  I later learned that margarine is something you can totally use in a recipe...but only when the recipe calls for it.  Margarine is NOT a substitute for butter in baking, as it is on a piece of toast (and I suppose some would argue that it is no substitute there either).

My problem is following directions.  I can read directions, and consider them when I am doing whatever it is I am doing, but any of you who know me well, know that I am a little loopy when it comes to being a stickler for rules.  This has gotten me into tons of trouble throughout my life; Breaking the mandatory shoe-wearing rule at summer camp got me bitten my a poisonous snake, Skipping class in High School got me grounded and Dressing up like Cookie Monster and stealing all the cookies in first year University...nearly got me evicted.

With all of this said, followed by my nine month pause from baking...I decided to give it another go.  I just really wanted copious amount of chocolate and the only way that was going to happen was if I made it out of thin air.  So I borrowed Kate's Krazy Double Chocolate Chip Heaven Cookie Recipe and got my friend Leslie and Tom to be my accomplices.

 Kate's Krazy Double Chocolate Chip Heaven Cookie
The original recipe hails from This website.  And I send a big Thank you to whoever invented it.  

Ingredients

  • 1 cup soy margarine ( I used Earth Balance)
  • 1 1/4 cups sugar 
  • 2 teaspoons vanilla
  • 1 tablespoon molasses 
  • 1/4 cup soymilk 
  • 2 1/4 cups flour
  • 1/2 cup cocoa powder
  • 1 teaspoon salt 
  • 1 teaspoon baking soda
  • 1 cup chocolate chips 

Directions

1. Pre-heat oven to 350 degrees.

 2. Cream margarine, sugar, vanilla and molasses until fluffy.  I used a hand blender, but you can totally get away with doing this by hand...With your big muscles!  

3. Add soy milk and combine.

4.  In a separate bowl, combine flour, cocoa powder, salt and baking soda.


5. Mix dry ingredients with wet ingredients. 


6. Stir in chocolate chips.


7. Place dough by tablespoon onto cookie sheet approximately two inches apart 


and bake for 9-10 minutes.


 The real Experiment was that we made two batches.  One with Whole Wheat Flour and one with White Flour. We weren't quite sure what would happen...as I said before I am not good at following directions and here is another perfect example...but I was just too curious.  Anyway, both cookies turned out REALLY GOOD.  the ones made with the white flour took an extra minute or two to cook...so about 9-11 minutes, while the whole wheat cookies took a little less at around 8.  The consistency and the taste of the two kinds of cookies were completely different but both were delicious.  the white flour cookies were gooey, spread out and richer.  While the whole wheat cookies were earthier and grainier (not ooey an gooey) but to be honest...You can't go wrong!  Pictured below are the white-flour cookies. 

 
Don't these look like heaven?  

 They sure taste like heaven!