Tuesday, February 23, 2010

The Perfect Pizza

Even though I live in Little Italy, the mecca of delicious pizza, I still insist on making my own here and there.  I usually buy my pizza dough at My Market Bakery in Kensington for something like $2 (it is also easily found at most grocery stores and other local bakeries...if not then ask them to provide it!)  and use whatever veggies I have in my Possession.  Last week I added all of the best things I could find which were...


 Ingredients:
1/4 eggplant sliced very thinly and halved
2 cups of mushrooms sliced thinly
2 gloves of garlic
4 tbsp of pesto
1/2 block of Mozzarella
1 Pre-made batch of whole wheat pizza dough 
Optional: 3 tbs of olive oil


Directions:
1. Preheat the oven to 400 degrees
2. Get the dough into your desired shape on your desired baking apparatus.  I use a cookie sheet, lightly sprinkle if with whole wheat flour and push and pound it out slowly.  you don't want to rip and reattach your dough...you want to keep it as one piece the whole time, so pumping it out may take a little while. 
3. If you want a thicker crust pizza then cover your kneeded out dough and allow to rest with a towl over it for up to 45 minutes...if you like it thinner then put toppings on and cook as fast as your hands can go
4. Put layer of pesto all over the pizza leaving as much crust that makes you happy.
5. sprinkle with your desired Cheese
6. Add the veggies.  When i use eggplant I put the chopped garlic right on top of the slices and then dribble with olive oil...this is for garlic lovers
7. Place in oven and cook for 20-30 minutes (Mine took about 25 minutes)
8. For the last couple of minutes turn the heat up or turn to broil so that your cheese will bubble...but keep an eye on it here so you don't have a burnt pizza pie

Moosh's Non-Fat Veggie Stock

My name is Michelle and I am a Soup-A-Holic.  It started about a year and a half ago when I discovered that making soup was easy, cheap, healthy and filling. I love that I can make soups from different ethnic backgrounds, that most soups share common ingredients, that i can put veggies that are good for me that I may not have eaten otherwise in a soup and get all of its nutrients....I could go on...The point is that I LOVE SOUP.  But until recently I had never made my own veggie stock!  I have been using Low Sodium Organic Veggie Bouillon cubes and calling it a day.  Things like stock intimidate me...you know?

Well, it turns out that Making your own veggie stock is no scarier then chopping up veggies and putting them in a pot! who knew? (apparently lots of people..but this is for those people who don't know and are about to learn)  Ahem

I have been recently shopping at St Lawrence Farmer's Market  on Saturdays.  (for non Torontonians this is a Year long artisan and farmers market that is a hub for local produce, meats cheeses and foods--also a hub for lots of NON local foods...but it is up to the shopper to become wise as to which is which) anyway...because of my schedule I have not been able to make it there very early meaning that I miss out on the majority of the eggs and cheese and most of the produce because the farmers leave when the sell out.  However since I get there late, the farmers who are left are happy to get rid of whatever they have left.  So several of these veggies I got for very cheap from a nice farmer who only had a little bit of stuff left.  Thanks!

 To make 16 cups of veggie stock (my intention is to freeze most of it...if you don't want to do this then cut the recipe in half!) I based this recipe on a mixture of ones I have read about...


Ingredients:
1 Onion
3 regular sized carrots
3 cups of mushrooms
3 cellery stalks
3 cloves of garlic
1 tomato
1/2 tsp of peppercorn
1 tsp salt
1/2 cup of parsley

Directions:
1. preheat your oven to 400 degrees Fahrenheit 
2. Chop up all of the veggies, don't worry about being too meticulous they will be strained out eventually!  save the peppercorn, salt and parsley for later...
3. For a completely non-fat stock pour 1/2 cup of water over the chopped veggies before putting them in the oven. If you don't mind a little fatty stock then go ahead and put a couple tablespoons of olive oil over the veggies.
4. Roast all together for 30-40 minutes
 

5. Split the veggies into two large pots and add 8 cups of water to each along with 1/4 tsp of peppercorn in each and 1/4cup or parsley in each. Allow to reach a boil and then let simmer for an hour.  
6. Strain your veggies out of and put aside for now.

7a. If you are making soup right away then take the allotted amount and continue on with your desired soup recipe and allow the rest to cool so that you may put it away in freezable containers

Moosh Method:
For step 7 I had a moral dilemma...what should I do with all of these fresh and organic (expensive and tasty) veggies? I didnt want to throw them out or compost them, I wanted to eat them! So I continued on to make a Valuable Veggie Soup. 

7b. Take the veggies and pick out the peppercorn (at this point it has done its job and if left it your soup will be VERY PEPPERY!!!) 

8. Decide how much soup you want to make and take that amount and put it in a pot (I went with half of my batch so 8 cups). Add the veggies along with sage, oregano, parsley (if you have any left--chances are if you have fresh parsley then you are trying to use it all up!) some thyme and whatever other spices you so desire, a pinch of salt to taste.
9. Bring to boil again and then simmer for another 45-60 minutes tasting and adding whatever it is you like.  If you have an immersion blender then you can go ahead and blend part of the soup.  I like my soup to be blended between chunks and smooth broth..so this is a personal preference.

At this point its up to you what you like--if you want to add some noodles or some spice?  I don't like those things particularly in my soup so I stopped here!

The end result is that I now have two 4cup containers of fresh frozen broth and 1 large batch of SUPER VEGGIE soup.   Really perfect for this grey-snowy-shitty-weather.


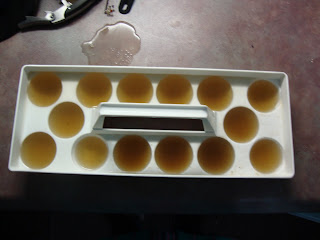
Also I put some of the stock in an Ice tray so that I can throw it in when I am boiling some grain or making a stir fry..yummy

Tuesday, February 16, 2010

Fake Fish Sticks

Something that kind of sucks about eating relatively healthy is that sometimes you just miss that processed foods flavor (or texture? or comfort?).  Because for most of us growing up in the 80s and 90s fast food and convenience foods were major treats.  Going to MacDonald's after soccer games, eating frozen dinners with the baby sitter and my personal favorite Kraft Mac 'n Cheese in the Blue Box.

When I was young my parents split up and their food choices were as different as night and day.  Whenever he had us, my father took my sister and me to MacDonald's for the now non-existent breakfast buffet.  Ashley and I munched down on food we knew was "bad" and enjoyed it mostly for that reason.  It was such a change from my mothers more health savvy (and delicious!) breakfasts of Oatmeal and pancakes which she would labor to make every morning before school.  I ate so well under my Mother's regime that the once-in-a-while cheat-eat didn't have too bad of an effect on my overall health.

Now that I am in charge of my own breakfast I usually opt for the more labor intensive Mother-Inspired breakfast.  I make either oatmeal (with Salt!), or yogurt and granola, or an omelet of some kind.  But once in a while I feel the need to indulge the naughty side of my stomach (Father-inspired) and that is when I go ahead and make hash browns, bacon, buttery toast ect.

I realize I have been rambling...so get to the point!

I found a recipe that is pretty healthy--but reminded me SO MUCH of childhood "bad" foods that I cracked out the ketchup and dug on in.

It is what I dubbed Fake Fish Sticks...because to me that is what they reminded me of....  In fact I got the original recipe from the TYFPC cookbook added by none-other but a college street cook Hannah Lewis. 

What you will need is
- 1 Firm block of tofu
- 3 tbsp of soy sauce
- 1 tbsp rice vinegar
- 2-4 garlic cloves (recipe calls for 2...but i like it extra garlicky so I added extra--it is up to you)
- 1 cup bread crumbs
- 2 tbsp of fresh coriander (the recipe called for parsley...but I had coriander so ahead with it I went)
- 1 tsp paprika (did you know that Paprika is Hungary's biggest export?)
- 1/2 tsp salt
- 1/2 tsp black pepper
- 1/2 tsp cayenne pepper (the more the merrier!)
- 3 tbsp whole wheat flour
- 6 tbsp cold water

 
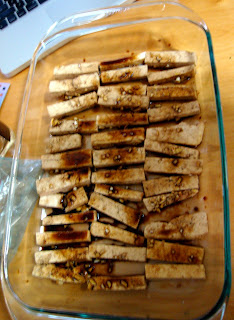
1. Cut the tofu into finger sized pieces.
2. Prepare marinate sauce by mixing together the soy sauce, garlic and rice vinegar.  Coat the tofu very well and allow to soak for up to 30 minutes. Now Preheat the oven to 400 F
3. Prepare the batter by mixing together the whole wheat flour and the cold water
4. In a separate bowl mix together the bread crumbs, spices and coriander (or parsley)
5. Now take those recently flavored tofu fingers and dip them into the flour/batter and then dip them into the spiced bread crumbs. Make sure that they are coated well--the thicker the better!
6.   Place on a cooking sheet that has been lightly oiled to prevent sticking. Make sure that each tofu finger has its own personal space and they are not impeding on the tofu finger next to them.  
7. Bake for 30 minutes...until they are nice and crispy.
8. allow to cool and enjoy! 

I enjoyed these sticks several ways.  I added them to a sandwich, I topped a salad with them and I dipped them in ketchup and ate them as finger food.  The lasted in my fridge several days and to reheat i just threw them into the toaster oven for a couple minutes until they were heated through and regained some of their crunchiness.

I really enjoyed this recipe!  It brought back a lot of memories of being a kid.  Before this I hadn't been able to really enjoy eating ketchup since I learned how much sugar was in it (I think in an Environmental class at U of T the day we saw a movie on the evil of Sugar).  But a trip to the organic store allowed me to get some semi-guilt free ketchup in the meantime until I learn to make my own (anyone have a good recipe out there??).


Also if you like THIS recipe you should pick up your own copy of the "So You(th) Think You Can Cook" Recipe book recently published by the Toronto Youth Food Policy Council by attending a meeting or event. Only five bucks!

Sandwich and Salad Combo

Recently I have been trying very hard to make my own food, my own sauces, my own soups and most importantly my own lunch.  This means that I often carry around 2-4 Tupperware containers at once and an extra shopping bag which I am sure the other riders of the TTC (public Transit) are just sooo curious about.  Anyway I wanted to share some simple recipes of the good old fashioned Sandwich and Salad Combo.

For both the salad and the sandwich you can use the same ingredients! Imagine that!


for the Sandwich I used:
- Pesto spread that I keep in my fridge and/or make when basil is fresh and accessible
- Shredded carrot
- Slice of CHeese
- Vegan/Veggie Burger--i went with the herb and garlic kind...you can put anything here though (Marinated tofu, Tempeh...a Tomato...)
- 1/4 avocado mushed at the bottom
- 1 Portuguese bun


 Then you just assemble and cut in half! 

As for the salad


- Shredded Carrot
- Craisins or Raisins
- Spinach
- some kind of nut--i used pecans
- an apple

As you know You can empty out whatever you have in your fridge for your salad...But if you are going for the sandwich/salad Combo its often easy to just used the same ingredients in both so when you are grocery shopping you don't have to get too carried away.

 This combo in particular I found to be very filling because with the sandwich cut in half, you can stagger your eating (if you have time!) and all the nuts in the salad make for a more hearty portion.

Enjoy lunch at the work place...people will be jealous.

Wednesday, February 10, 2010

An Experiment in Baking

I am not much of a baker...I enjoy a treat here and there (and when it is here..I usually enjoy chocolate) but I often rely on others to do all the churning and measuring for me as to avoid any baking catastrophe.  Sometime last year I began to bake for myself...I made a batch of cupcakes, followed by some shortbread cookies and then tried a cookie recipe.  The fated cookie recipe called for butter and since I didn't have any...I used MARGARINE...Now I am sure if you are any kind of baker you may know what I am about to tell you.  But my cookies tasted very weird, they tasted salty and no one wanted to eat them.  I later learned that margarine is something you can totally use in a recipe...but only when the recipe calls for it.  Margarine is NOT a substitute for butter in baking, as it is on a piece of toast (and I suppose some would argue that it is no substitute there either).

My problem is following directions.  I can read directions, and consider them when I am doing whatever it is I am doing, but any of you who know me well, know that I am a little loopy when it comes to being a stickler for rules.  This has gotten me into tons of trouble throughout my life; Breaking the mandatory shoe-wearing rule at summer camp got me bitten my a poisonous snake, Skipping class in High School got me grounded and Dressing up like Cookie Monster and stealing all the cookies in first year University...nearly got me evicted.

With all of this said, followed by my nine month pause from baking...I decided to give it another go.  I just really wanted copious amount of chocolate and the only way that was going to happen was if I made it out of thin air.  So I borrowed Kate's Krazy Double Chocolate Chip Heaven Cookie Recipe and got my friend Leslie and Tom to be my accomplices.

 Kate's Krazy Double Chocolate Chip Heaven Cookie
The original recipe hails from This website.  And I send a big Thank you to whoever invented it.  

Ingredients

  • 1 cup soy margarine ( I used Earth Balance)
  • 1 1/4 cups sugar 
  • 2 teaspoons vanilla
  • 1 tablespoon molasses 
  • 1/4 cup soymilk 
  • 2 1/4 cups flour
  • 1/2 cup cocoa powder
  • 1 teaspoon salt 
  • 1 teaspoon baking soda
  • 1 cup chocolate chips 

Directions

1. Pre-heat oven to 350 degrees.

 2. Cream margarine, sugar, vanilla and molasses until fluffy.  I used a hand blender, but you can totally get away with doing this by hand...With your big muscles!  

3. Add soy milk and combine.

4.  In a separate bowl, combine flour, cocoa powder, salt and baking soda.


5. Mix dry ingredients with wet ingredients. 


6. Stir in chocolate chips.


7. Place dough by tablespoon onto cookie sheet approximately two inches apart 


and bake for 9-10 minutes.


 The real Experiment was that we made two batches.  One with Whole Wheat Flour and one with White Flour. We weren't quite sure what would happen...as I said before I am not good at following directions and here is another perfect example...but I was just too curious.  Anyway, both cookies turned out REALLY GOOD.  the ones made with the white flour took an extra minute or two to cook...so about 9-11 minutes, while the whole wheat cookies took a little less at around 8.  The consistency and the taste of the two kinds of cookies were completely different but both were delicious.  the white flour cookies were gooey, spread out and richer.  While the whole wheat cookies were earthier and grainier (not ooey an gooey) but to be honest...You can't go wrong!  Pictured below are the white-flour cookies. 

 
Don't these look like heaven?  

 They sure taste like heaven!

Wishful Wintertime Smoothie

Its hard to stay focused and bright eyed in the cold dark months of winterland places like Toronto.  The other day I went for a run with my friend through the park, the sun was KIND-Of shining...but to be honest it hadn't KIND-OF shone in a long time! So it was exciting and it fueled my legs and pumped my heart and my pale pale skin grabbed onto the very few rays that were shining down and gave me the slightest tan.  That is right...my skin was so desperate for the tiniest amount of sun, that it absorbed every bit it could, and later on another friend actually noticed (So it was not all in my head!).  The moral of this story is that my body needs some sunshine, some fruit and some sweet comforting treats.  
I would like to share the simple mixture that I have been throwing together and calling breakfast for the past week (and maybe the next week...yum!).

My Wishful Wintertime Smoothie
I have been using (but of course you can always use another combination)  

-1/2 banana
- Approximately 1/4 of blueberries (as the fresh ones at my food store looked Poopie..I opted for frozen in until they begin to look more appetizing)
- 1/4 cup of Plain Organic Yogurt
- 1/4 cup of Organic Almost Skimmed Milk
- 1 tsp of honey


I am lucky enough to have the use of an immersion blender, So I just throw all of the ingredients into a large cup and Blend away until all the chunks go away and my smoothie reaches that lovely purplish color.  I chose the best looking frozen blueberries I could find...certainly the most expensive but the package asserts that they are farmed in a sustainable way so I choose in this case (until I have time to further research this.."Stahlbush" farm) to have faith.  As the ingredients did solely include blueberries I think I may be safe this time!  The Honey I was lucky enough to buy at Dufferin Grove Market from a couple that bottles their honey right here in Ontario.  The had an impressive selection of honey--the most intriguing was ginger honey--but I went for the regular ol' every day honey...I didn't want to get to carried away! 


 And there you have it, a simple, yummy breakfast/snack/desert.  If you do not have an immersion blender do not fret! You can use a regular blender, a hand mixer...a food processor...or just put the things together mix with your spoon and EAT! it really is a question of how chunky do you like your food. 

Sunday, February 7, 2010

The Transparency of Food

Thanks to Michael Pollan, whenever I go grocery shopping I hear his voice in my head reminding me to "shop around the border of the store to focus on whole foods (not packaged non-food items)"  "Eat FOOD, mostly plants, not too much".  It reminds me to think about what I consider to be The Transparency of Food.

On the most basic level I think that the food we eat and drink should be transparent--  that we should know what ingredients were mixed together to make the final product. flour + baking soda + strong kneading hands = Bread.

Just as important as what is IN our food should also be what is NOT in our food... I looked at this bottled orange juice this morning, I noticed that the third ingredient was Pasteurized Fish Oil, and the fourth ingredient was Gelatin.  What do these things have to do my OJ? What do they have to do with my food?

On the next level food Transparency should be: Where does my food come from?  followed by: Why does it come from there? followed by: What sort of policies are responsibility for the safety of my food? And OnAndonAndon

While thinking about our food, trying to eat mostly "food" but not too much! I think that for anyone anywhere a wonderful place to start is to simply ponder the ingredients--avoid anything that doesn't make sense (Like how I noticed Starbucks adding high fructose corn syrup to their yogurt???) and feel free to fall as deep into this rabbit hole as you so desire.  In my case, I can no longer see my way out...

In this Vein I would like to share a simple, yummy snack--food for thought if you will.  Some non-local but Goopy-Guacamole accompanied by ever so Perfect-Pita Chips.

Ingredients for 2-3 person snack:
- 1-2 Pitas
- 1 Avocado
- 3 tbsp of lemon or lime juice (or one whole lemon or lime)
- 2 tsp of salt
- 1 garlic clove
- 1 tsp of cumin
- curry powder and Paprika (you can use one or two of your favorite spice..these are just mine!)


Perfect Pita Chips
1. Set your oven to 350
2. Take some fresh bakery-bought pita and tear it up into kinda-triangles, or whatever shape makes you happy
3.  Place them on a cookie sheet or casserole dish or any oven safe apparatus
4. Sprinkle a thin layer of: Curry and Paprika and Salt along with a sprinkling of olive oil
5. Place them in the oven for 20-30 minutes (depending on how crispy you want 'em)

Goopy Guacamole
1. Take one Avocado and feel that it is nice and ripe---If you squeeze it and can feel that it is tender then it is ready to go...if it is very squishy, it should still be fine but should definitely be used right away before it goes bad!
2. in a bowl mash the Avocado with: minced garlic, lemon or lime juice (add less juice if you want your Guac to be super chunky and more juice if you like it creamy), salt, cumin....
3. mix together very well, taste and make important decisions on which ingredients you want more or less of! (more salt? less garlic?)

When the chips are nice and crispy, sit on your couch, turn on some music, and enjoy this lovely treat! 
  

Thursday, February 4, 2010

Sran Style Stir Fry

In terms of cooking, I owe a lot to my roommate Venice's mother.  As she sent her baby daughter off to study in the big city she entrusted her with a book half written in Punjabi and half in English with different colored lentils taped inside, cautionary notes on things like to always add the Garam Marsala last..that is just before you throw tomatoes in and her father's email address...  Little did she know that I would study her notes and recipes and practice them throughout my entire fourth year of University.  I would never call myself an expert--But I have become quite comfortable using a specific combination of spices: Turmeric, Coriander, Cumin Seeds, Salt, Garam Marsala and of course Tharka.  Tharka being the combo of sauteed onions, ginger, garlic and Cumin seeds (yum!).  Her recipes introduced me to Indian Lentils/Dhal and taught me that there is an important difference between the colors, and that the mixture of half yellow and half orange is superior.

Anyway Tonight I wasn't sure what to make for dinner...I had just picked up some exciting local veggies that I was pumped to use!  At Dufferin Grove I picked up some Green House Spinnach grown right outside the city and from Metro the other day I got these snow peas that are grown right downtown by "Super Three Produce" (and a bag of them was only 99 cents!).  In order to put all the things i wanted together I settled on a Stir Fry "Sran Style".

I gathered my ingredients
1/4 cup of quinoa (I used Red Quinoa for the first time! mostly for the color...)
1 Carrot (grown in Ontario)
1/4 white onion (grown whooo knowss where?)
a handful of snow peas
2 handfuls of spinach
2 garlic cloves-
1 small piece of ginger-
1 egg (totally optional, i just have a lot of eggs right now..)
1 handful of fresh coriander (also optional, Ive just been really into buying bunches of it and therefore throwing it into everything so i can use it all up)
and of course: turmeric, coriander, salt and cumin seeds

Stove Top

1. Add the 1/4 cup of Quinoa with 1/2 cup of water.  Right away add 1/2 tsp of turmeric and coriander along with 1/2 tsp of salt (or less salt if you desire).  Allow to reach a boil and then cover and simmer.  Quinoa cooks pretty fast maybe 5-10 minutes..if its a new kind of grain for you then keep an eye on it!


Stir Fry


1. Add the Onion, tsp of cumin seeds and garlic.  Allow to mix together and then when the onions become tender throw in the ginger.
2. Next add the rest of the veggies--the snow peas (cut into 1/3s), spinach (chopped a bit) and carrot (grated).
3. allow to all become friends and add some more of the spices--another 1/2 tsp of turmeric, coriander and salt
4. When the Quinoa is cooked throw it into the mix.


5. Optional: Stir together and make a hole in the middle of the veggie pile and crack an egg in.  Mix the egg into the veggies, twisting and turning it all around so that its got a little egg all over the place. 


6. Turn off heat and EAT


Just as I sat down to eat in walks my inspiration/roommate.

Tuesday, February 2, 2010

My Ever Expanding Vinegar Collection

After spending my evening with the extraordinary members of the Toronto Youth Food Policy Council (TYFPC) I went to sleep feeling inspired, connected and motivated.  However this morning I woke up feeling stuffed up and sore with a pounding headache--but also very hungry...As I have sporadic days off today was my day to do it all bankgroceriesswimrun-savetheworld.  But instead I peeled myself out of bed and was determined to make Kelsey's Sweeeeet Potato Salad.  I glanced at the ingredients and realized I only had a few...but what I thought were the essentials so I got to it!

The Ingredients I had were
2 medium sized Sweet Potatos
1 Cup of Pecans
1/2 Red Onion
1 Green Pepper
1/2 Hot House tomato
A bunch of Coriander
Curry Powder (probably a tbsp or so)
1 tbsp Brown Sugar
1tbsp olive oil
1 tsp dijon mustard
1 tsp honey
salt/pepper to taste
2 tsp of cumin
(what I didn't have was...)
1 tbsp cider vinegar
1 tbsp red wine vinegar


Sweet Potato Party

1. Wash the potatoes very well..because  I do not believe in taking their skin off..that is where all the good stuff lives! Then cut them up into small bite-sized cubes..or whatever shape makes you happy
2. Lightly coat the potatoes with olive oil and curry powder--You don't have to be exact with this.  I just sprinkled and tossed until they all had a taste of curry.  I also sprinkled a couple pinches of brown sugar lightly over the batch...I couldn;t help myself!
3. Bake for 25-35 minutes at 350--again I am not sure if my oven is malfunctioning, but even as their small cubed selves, my potatoes took a long time to become tender.
4.  After about 20 minutes throw the pecans on top of the potatoes and allow them to roast...I recommend giving a couple more sprinkles or brown sugar so that the pecans may candy ever so slightly

Meanwhile...

5. Saute the Green Pepper...or Red Pepper...or whatever really!  until it is tender.
6. Chop up and combine tomato, green onion (a red onion would also be delish instead), Pepper, and Potatoes.
7. Chop up cilantro and toss all together


This is about the time i realized that I was missing some very important ingredients, also that my coriander was nasty-town...so I dragged my ass through the snow-flurries to buy both kinds vinegars (I added them to my ever-expanding shelf of assorted vinegars, oils and liquids)...and all of my groceries.  My mild expedition gave the potatoes time to cool so when I got back everything was ready to mix.


Get 'er Dressed
 8. Add all the dressing ingredients and mix well...make sure that the oil combines thoroughly with the honey and mustard and all the other yummy things...feel free to add more or less honey depending on your desired sweetness

Walah!
9. Toss all together...try not to pick out all the pecans and eat them before you serve it..I know its hard but you must resist!


Still feeling inspired, and headache free I have a date with my salad and my book for the evening.